Dog Lover Thank You Bookmark & Gift Card Holder
Posted by Amanda Reichard on 19th Sep 2017
Hello! This month I am excited to share my latest Krazy Kreations bookmark and gift card holder design with you. We all have people in our lives who we would like to thank with both something handmade and a gift card. These projects are great for your dog sitter or any dog lover. Both projects feature the Krazy Kreations dog outline stickers and Authentique paper. The bookmark will remind the recipient how much they are appreciated, again and again; and, the gift card holder will give you a cute, more personalized way to present a gift card to show your appreciation.
To create the bookmark:
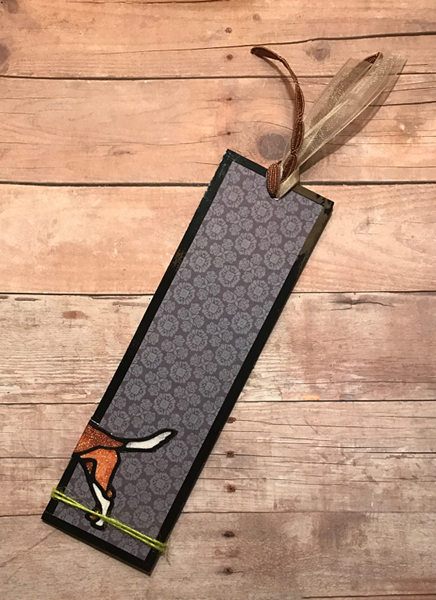
1. I started with the best part: Making the dog!
a. Prepared the Glitter Paper: I used my fingers to burnish the glitter to make it smooth and add luster from the oils in my fingers.
b. Prepared the dog and bone: I selected a standing dog and a bone from the Krazy Kreations Dog Outline Stickers sheet to peel from the sticker sheet and adhere to white glitter paper. Using a Copic marker cap, I burnished the stickers onto the paper, ensuring the sticker was sealed to prevent the color from bleeding.
I colored the dog with the lightest color of my alcohol marker combinations. (Note: I also varied the colors I used in different parts of the dog, and even left some spaces white). I used Copic E25, E33, and E13 for the dog, and I left the bone white. After coloring the dog image, I cut it and the bone out and used a black Sharpie to color the edges.
c. Prepared the grass: I used some of the scraps from the glitter paper to cut jagged pieces into grass shapes and colored these with Copic G05 and G14.
2. I cut a piece of cardboard to 6" x 1 ¾”. You can use any type of thin cardboard because it will be completely covered. I used a black Sharpie to color the edges.
3. I cut a piece of the plaid paper from the Authentique Explore 6 x6 pad to the same size as the cardboard and adhered it to the cardboard front.
4. I cut a piece of the dark blue patterned paper from the Authentique Explore 6 x6 pad to the same size as the cardboard and adhered it to the cardboard back.
5. You’ll notice that there is some “extra” black sticker on the edges of all of the Krazy Kreations outline stickers. From a couple of these I trimmed 1/8” on both long sides. I used these to line the outside edge of the front and back of the bookmark.
6. I cut out one of the mini postcards from the postcard paper in the Authentique Explore 6x6 pad and adhered it diagonally to the bookmark. Then, I trimmed the corners so that they were even with the bookmark edges. I added a “Thank You” sticker from the Krazy Kreations Thank You sentiment stickers.
7. I adhered the front half of the dog onto the front of the bookmark and wrapped it around to the back. I cut the bone in half and adhered it on either side of the dog’s mouth. And, I adhered the grass at the dog’s feet, on the front of the bookmark.
8. I punched a hole near the top center of the bookmark and added ribbons. Finally, I tied green twine around the bottom of the bookmark.
To create the gift card holder:
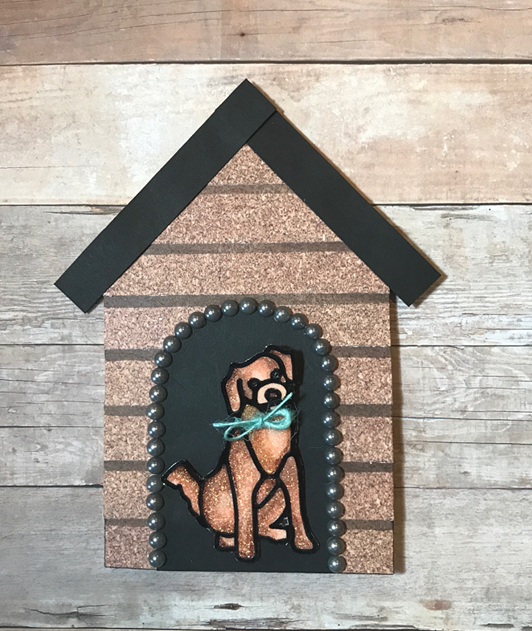
Front Cover
1. I started by making the seated dog, using the same technique and Copic colors described above for the other dog.
2. I cut a piece of thick cardstock to 6 ½ x 4 ½” and folded it in half to create a small card.
3. I cut a triangle out of the same cardstock that is 3 1/4” x 2 3/8” x 2 3/8” and adhered it about ½” down from the top of the front of the card.
4. I cut 8 strips of the cork patterned paper from the Authentique Explore 6 x 6 pad to size 3/4” x 3 ¼”. I ran the flat-edges side of Copic W5 along one long edge of each piece (to create a shadow effect). I adhered the first piece along the bottom edge of the card. I adhered each successive piece, overlapping it with the previous piece by about 1/16”. Then, I trimmed the excess “board” at the top, along the edges of the triangle.
5. I cut a 3 x 2” “door” for the doghouse out of black card stock, rounding the top, and adhering it centered along the bottom edge. I also cut two 3 x ½” strips from black card stock and adhered the along the edges of the triangle, to create the roof line.
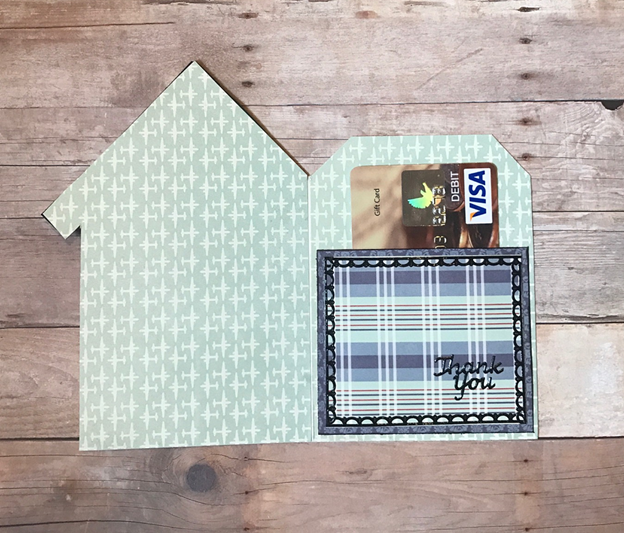
Inside
1. I lined up the light green airplane paper from the Authentique Explore 6x6 pad with the bottom and center of the card and traced the shape of the front cover onto it with a pencil. I cut out the traced shape and adhered it to the inside left side.
2. Next I cut a 3 ¼ x 4 ½” rectangle and adhered it to the right inside side. I then closed the card and trimmed the corners of the inside to match the edges of the roof line.
3. I cut a 2 ½ x 3” rectangle out of the dark blue patterned paper from the Authentique Explore 6x6 pad, and a 2 ¼ x 2 ¾” rectangle out of the plaid paper from the same pad. Then I added Krazy Kreations Lacy Border Stickers along the edges of the plaid paper. I also added a Krazy Kreations Thank You sticker. The plaid paper is centered and adhered to the dark blue paper. I put adhesive along the side and bottom edges (only) of the blue paper, to create a pocket for the giftcard.
I hope you enjoy making these projects to show someone your appreciation!
Best wishes until next time,
Amanda
Krazy Kreations Supplies:
Copic Markers: E13, E25, E33, G05, G14, W5