Mermaid Scrapbook Page
Posted by Cherie Hadjian on 25th Mar 2020
Hello KK Fans! I have been thinking outside of my crafting box and went with something a little different this week. I created a 12x12 scrapbook page using Krazy Kreations Outline Stickers, Cosmic Shimmer Aurora Flakes, and Micro Fine Glitter Paper.
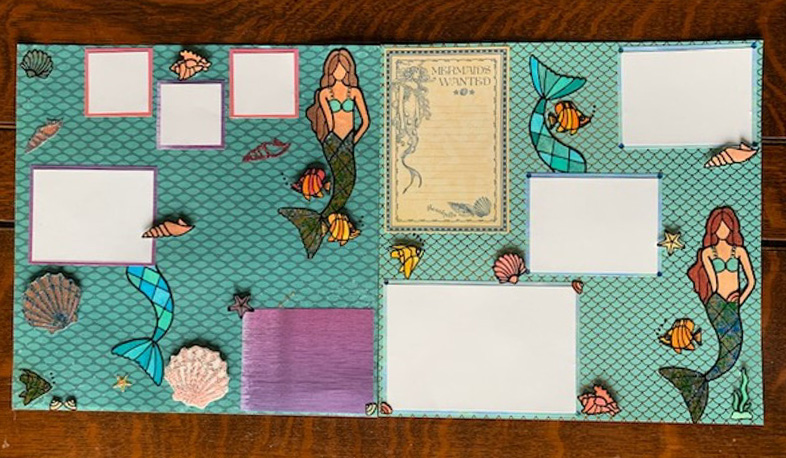
This cute page is the start to a fun summer scrapbook.
To create the page:
1. I started with a 12x12 "mermaid tail" paper from Paper Studio. This started my creative skills flowing.
a. Next, I picked out some paper to use for the base for pictures. I knew I wanted to do 3x4 and 4x6 photos. I cut the bases for these 1/4" larger. 3 1/4 x 4 1/4 and 4 1/4 by 6 1/4.
b. Next i chose a memo card from Graphic 45 that will allow me to write some little notes to go along with the photos.
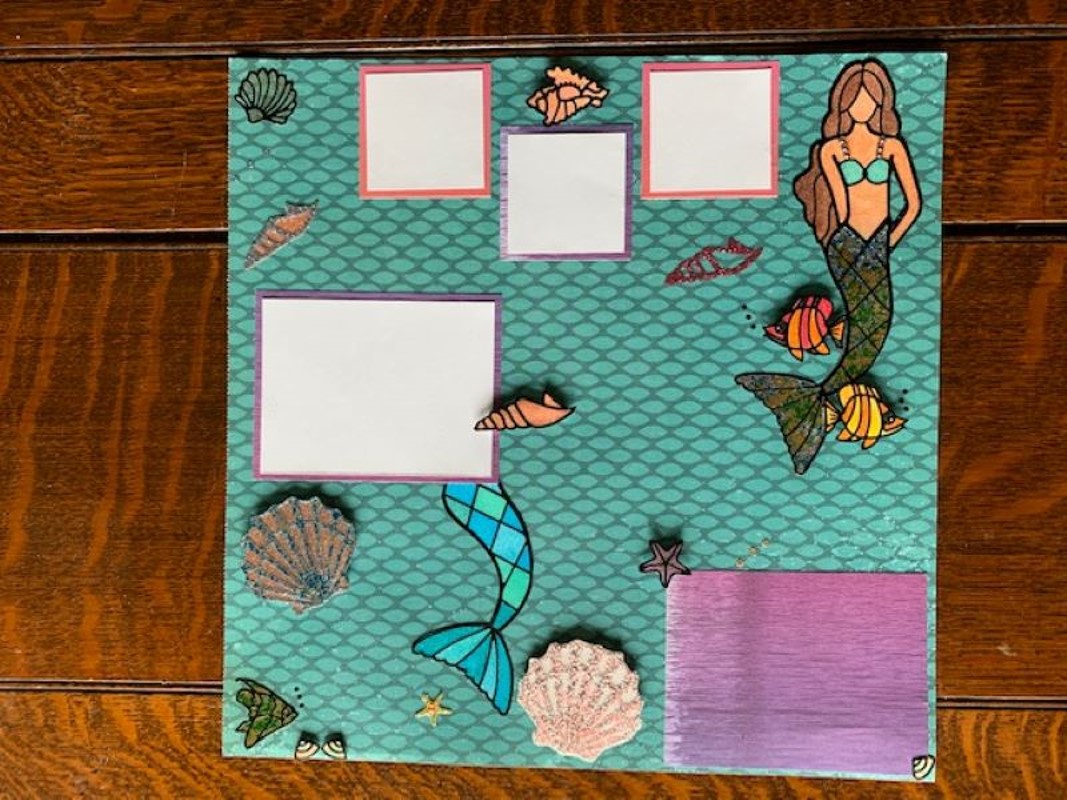
2. The mermaid outline stickers were perfect for this layout.
a. Preparing the Glitter Paper: I needed to burnish it. To do this you rub your fingers on the glitter paper to make it smooth remove any loose glitter and the oils from your fingers makes the glitter shimmer and shine even more.
b. The outline stickers: I used the Mermaid Chip Girl (3907) from Krazy Kreations Outline Stickers. I decided to be a little daring with the mermaid and did two different techniques. For her body I trimmed glitter paper and adhered the sticker to it. For her tail, I adhered it to double sided tape, leaving the backing on so it wouldn't stick to everything. Using my fingers, I rubbed the stickers onto the paper, and then turned over the paper and rubbed with pressure to ensure the sticker was stuck securely onto the glitter paper. This will prevent the color from bleeding between the sticker and paper. for her tail I made sure it was stuck on securely.
c. The extra tail, fish and shells were perfect additions to the page. I peeled and adhered those to the glitter paper. Following the steps above as to make sure that there was no bleeding from the Copics.
d. I had a rainbow of Copics for these stickers. For her body I used E00 and E11, hair was E15 and E08, her top B00 and B04. On her tail I used jade Gold and Blue Ice Aura Flakes. Fish and shells were Y11, Y19, YR30, YR04, RV23, R20, E08, E00, G00, G17. Make sure to always start with the lightest color first. When adding the dark color, I feathered it, making sure not to leave even straight lines. This makes it easier to blend the colors. Once the coloring is completed, I cut the hive and bees out and used a black Sharpie to color the edges. Using the black sharpie will hide the white edges and make it have a nicer finish.
e. When using the Aurora Flakes, you pinch some out of the container and place on the tape. Make sure all of the sticky is covered and then take a dauber and rub the flakes. This will make the flakes stick to the tape and rub off all the extra. The extra I place back into a container.
3. I cut all of the outline stickers out, used a black sharpie around the edges, covering up the white of the paper. I used Zip 2-way glue to adhere the body of the mermaid and peeled the protective cover off her tail and adhered her to the page. I pop dotted a fish and a few of the shells. Tape runner was used to adhere the paper for the photos and the memo picture.
4. Placing the 12x12 page in a protective sleeve was the last step.
Just in case you have lots of craftiness, here’s an idea for page 2.
I hope this page brings you some inspiration! Happy Crafting!
Thanks for stopping by,
Cherie
Krazy Kreations Supplies:
Paper Doll Outline Sticker, Mermaid KK3907
Paper Doll Chipboard Shape, Mermaid
Micro Fine Glitter Papers, Cool Highlights
Copics - E00, E11, E15, E08, B00, B04, BG10, BG13, BG57, BG49, BG18, G00, G17,
YR30, Y11, Y19, YR04, R20, RV23
Other Supplies:
Zig-2 Way Glue
Scrap That!- Pop dot