My Besties - Trixie and Kitty Spider
Posted by Kara on 22nd Jul 2014
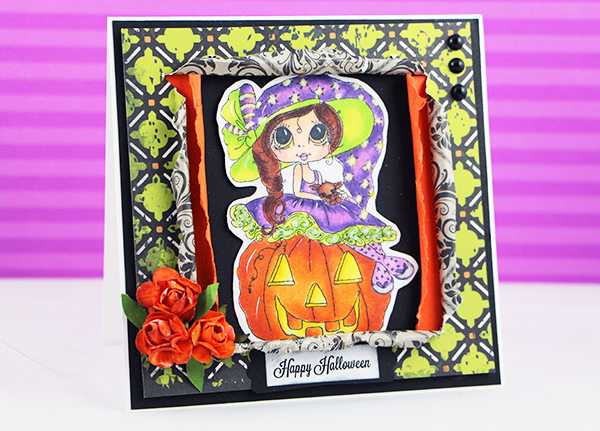
We have all heard about Christmas in July, but I am thinking about Halloween in July! I absolutely love this stamp by Sherri Baldy at My Besties and I could not resist picking her up and coloring away with my Copics. Here is how I made the card …
First, stamp MYB-220 clear stamp on Copic X-Press It paper using Memento Tuxedo Black ink pad. Color stamped image. I used all of the colors listed below as I wanted a wide variety of color on my image. I found in most cases, using a light and dark Copic Marker combo in the same color family gave me the shading and blending I wanted in the stamped image. To add sparkle to the image, I used my quickie glue pen on the stars in the hat, the ruffle on the dress and the tips of the shoes and sprinkled Elizabeth Craft Warm Diamond glitter to those elements. I also used the Copic Opaque White Brush to add detail to the eyes and areas on the left side of the pumpkin, dress and hat. When finished, I trimmed around the colored image, creating an 1/8” white matting.
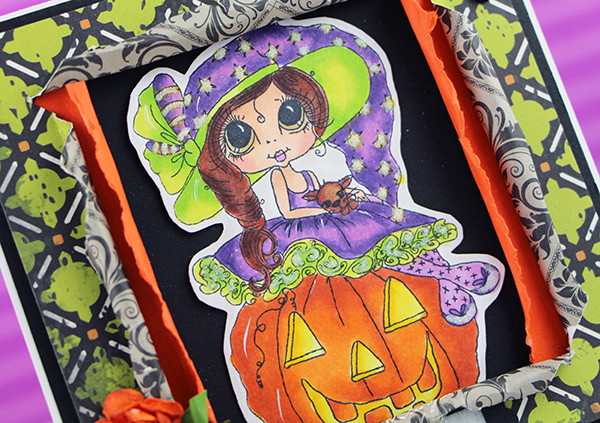
To make the card, I folded a square pre-scored 5 ¼” x 5 ¼” white card and adhered a piece of 5 1/8” x 5 1/8” black cardstock to the center. I then cut a piece of Halloween pattern cardstock 4 7/8” x 4 7/8”. Turning the pattern paper over, I used my craft knife to make an “X”. Then, using my fingers, I tore each edge and rolled back to create a square, rolled window in the pattern paper. To add depth to the card, I cut 2 pieces of orange cardstock at 1” x 4 ¾”, tore one edge of each piece and rolled. I then attached one piece on the left and one piece on the right under each pattern roll. Using pop dot dimensionals, I adhered the pattern piece to the black cardstock. I then adhered the colored image inside the rolled window. To finish off the card, I added three black pearls to the upper right corner of the card and three mini flowers to the lower left of the card (I used YR 15 and YR18 Copic Markers to alter the color of my mini flowers). Lastly, I adhered a sentiment to the center of the card under the colored image on the pattern paper.
Supplies:
 |
 |
 |
 |
 |
 |
 |
 |
 |
 |
 |
 |
 |
 |
 |
 |
 |
 |
 |
 |
 |